10 Rules for Smart Ebay Shopping

Image

So I know most of my posts are DIY oriented but I’ve come to realize, I’m kind of an Ebay expert shopper. (No big deal or anything) But as such, I also have come to realize that Ebay can be the best and worst place to shop depending on how you use it. So, as self appointed Ebay Expert Shopper I thought I would provide some tips on how to save money, avoid scams, and get what you want out of your products.

RULE #1

ALWAYS check the feedback of a seller before buying anything from them. As a general rule of thumb, try to avoid sellers whose number of negative feedback accounts for 25% or more of their total feedback. Anything less than that, then you can generally attribute negative feedback to a frustrated buyer who was the rare victim of the occasional fluke in a seller’s normal operations.

RULE #2

When possible, opt for items that have a real life photo instead of a product photo that you would see in a catalog. One reason this is important is that it allows you to obviously inspect the product prior to purchasing it, whereas with a stock photo you will only see the product at its prime. Which, lets be honest, is not the norm with Ebay items. Another reason is that sellers who take the time to photograph their own products are generally more invested in the product they are selling and take pride in its quality. So in summary, if the items photo is a stock photo be prepared for a poor quality item.

RULE #3

Don’t write off an item just because it sounds too good to be true. It’s Ebay, “too good to be true” happens. The reason that so many products will sell on Ebay for dirt cheap prices is that a large portion of sellers on Ebay are wholesale sellers or mass produce their products to such an extreme that they sell the overstock on Ebay. If a product is selling for $1 it may be terrible quality, BUT there is a good chance it will be just fine. I’ve bought multiple rings and bracelets off Ebay for $1 or less and have never had problems. Trust your instinct.

RULE #4

This one is specific to cell phones you’ll find on Ebay. I was recently in the market myself to buy a cell phone and perused Ebay for one. BE CAREFUL. Ebay is wonderful, but is also a hotspot for sellers to sell off stolen cell phones. For those of you that don’t know, stolen cell phones CANNOT be reactivated. A way to avoid such cell phones is to look in the description and see if you see the words “GOOD ESN” or “BAD ESN”. A bad ESN indicates the phone will not be able to be activated ever again as it was reported stolen or something of that nature. Unless you’re looking for cell phone parts, do not buy these. Warehouse sellers of cell phones are always guilty of accidentally selling stolen phones. So again, beware. Check the feedback, if others report the phone having a bad ESN you need to be prepared for yours to also be.

RULE #5

Avoid sellers with return policies that will charge you or will simply refuse to accept returns. It is simply too often a way for sellers to make easy money. Sell you a terrible product, refuse to accept a return. You’re stuck with a piece of junk and they’ve made a quick buck.

RULE #6

Contact the seller with questions about the product prior to purchase. Seriously, make up questions if you have none. Contacting the seller ensures that they are actually open to contacting you. There is nothing worse than purchasing a product, being dissatisfied, and then being stuck with it because the seller won’t respond to you. Establish contact ahead of time.

RULE #7

Never, ever, ever, place a bid before you absolutely have to. I don’t know why its so hard for people to realize, but the more you bid the more the price goes up. If you bid 3 days before the end time, many other people will outbid you numerous times before it sells thus raising the price more than it needs to. Inevitably, the price will go up as someone else is going to be bound to bid. But a way for you to keep the costs down is to wait till LITERALLY about the last 10 seconds before placing a bid. I usually bid about 10 seconds before an auction ends and almost always win auctions as a result.

RULE #8

Watch lists are your best friends. Put multiple versions of an item on watch lists and watch the item to see which retains the lowest price. Then bid, at the last second!

RULE #9

Download the Ebay app on your phone. It sounds silly, but downloading the app will enable you to be so much more successful. It will remind you ahead of time when an auction is closing so you can get yourself prepared to make a final bid without having to run to a computer or miss an auction because you weren’t at the computer.

RULE #10

Beware of the “Ebay Buyer Protection”. Honestly, that entire thing is a way for Ebay to cover its butt against angry customers who don’t get what they want or get scammed. But in all honesty, there is not much that Ebay can do for you if you get scammed or can’t get in touch with a seller. The only things Ebay can do for you is disable their account and get you in touch with Police in your area or their area. Aside from that, there is nothing they can do. Don’t be expecting full refunds from Ebay themselves if things go awry, it won’t happen. Its between you and the seller. NOT Ebay.

DIY: Bow Wreath

Image

DIY: Bow Wreath

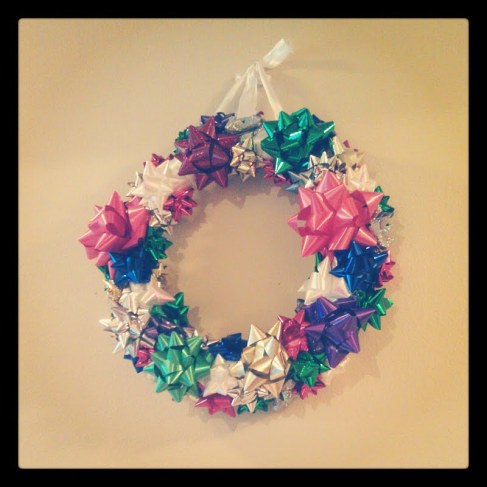
What more can I say, Christmas decorations!!

WHAT YOU WILL NEED:

  • Foam ring (Micheal’s has them!)
  • Hot Glue Gun
  • Bag of Bows
  • Ribbon

STEP ONE

This is a super easy craft! Just take your ring and your bows and glue them onto the ring! But first, make sure you have the ribbon attached to your ring so you can hang it up when you’re done!

STEP TWO

Have fun and glue all of the bows you can fit onto the ring! And voila!!

DIY: Lyrics on Canvases

Image

DIY: Lyrics on Canvases

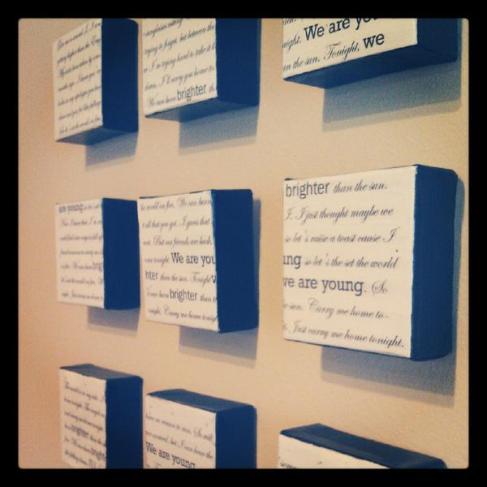
For this one I was inspired by a similar craft I saw on Pinterest (Pinterest is the bomb yall). Anyway, the one I saw was awesome, but wasn’t exactly what I wanted and used wooden blocks instead of canvases. I wanted canvases so here it is!

WHAT YOU WILL NEED:

  • Pack of canvases (Mine came in a pack of nine 4 by 4 canvases)
  • Black paint
  • Mod Podge
  • Foam Brushes
  • Adobe Illustrator (Or some insane formatting skills with word)
  • Printer
  • Straight edge cutter or steady hands with scissors

STEP ONE

So first off, go ahead and paint the edges of each canvas with black paint. You will most likely have to use two or three layers to get a good cover.

STEP TWO

Once dry, mod podge the edges of the canvases to give the black a nice finish. Next go ahead and pick out a song, I used We Are Young by Fun. 

STEP THREE

Using Adobe Illustrator, create 9 artboards having all of them touching but not overlapping. Size all of the artboards so each is slightly smaller in width and length than the canvases you are using. On word, copy and past the lyrics and format them so the font is what you would like. I varied the fonts throughout the lyrics. Then place the lyrics onto the artboards on Adobe Illustrator. Format them and size them so that they fit well enough that nothing will be cut off at the bottom. Its fine if some of the letters or words get cut off at the edges of the spaces between canvases.

STEP FOUR

Print the artboards out having one on each page to avoid them being cut off. Cut out each meticulously. Once cut, mod podge each onto a canvas. Let dry, then layer mod podge on top to finish.

STEP FIVE

YOU DONE!

Cheap & Cute Christmas Centerpiece

Image

Cheap & Cute Christmas Centerpiece

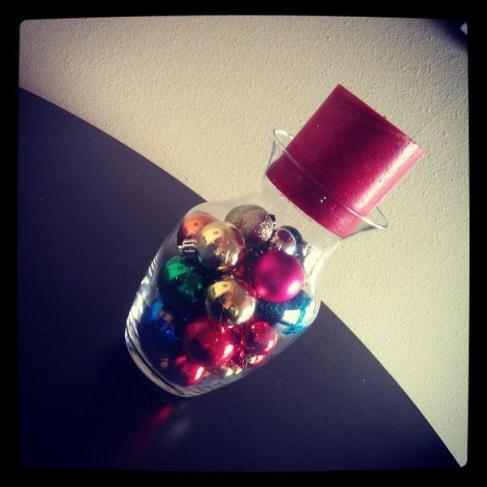
I kind of went Christmas crazy this year. LOVE CHRISTMAS. Just saying! So this is really pretty straightforward.

YOU NEED:

  • Vase
  • Pillar Candle
  • Christmas Ornaments

All you have to do here is fill the vase with ornaments and plop the candle on top! Pretty cute right?!

DIY: Ribbon Quote Canvas

Image

DIY: Ribbon Quote Canvas

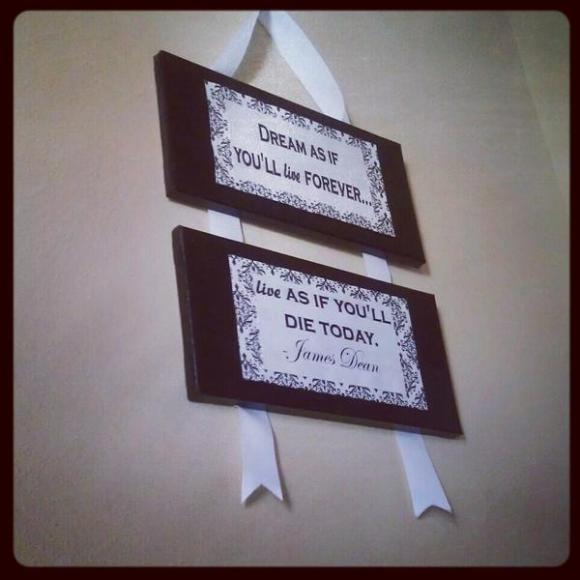
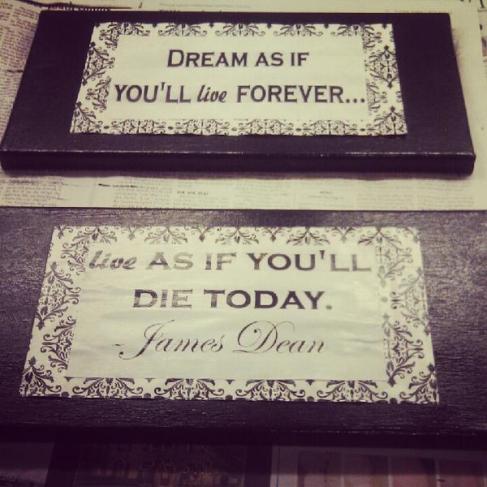
I love this one. Not gonna lie! It turned out pretty cute! So for this one I had bought two canvases in a pack for a great deal and had no idea what to do with them! Then this idea came to me! So I thought I would share it.

WHAT YOU WILL NEED:

  • Two canvases (A lot of places sell them in packs of two for a good deal)
  • Foam Brushes
  • Mod Podge
  • Printer
  • Scrapbook Paper (Go for a thinner paper)
  • Black Paint
  • White Paint (For touch ups)
  • Hot Glue
  • Ribbon
  • Staples (Optional, you can use hot glue for this part if you choose)
  • Straight edge cutter or scissors and a ruler

STEP ONE

Find a quote! When you have your quote, type it out on Word and put it into the font you want! For this one you will have to play around with font sizes and perhaps print them a few times to get the right size! Split the quote into two parts, one part for the top canvas and one for the bottom canvas. Then go ahead and print them out when you have them finished!

STEP TWO

Using your selected scrapbook paper, use a ruler to measure out how large of an area you want the scrapbook paper background to cover on the canvas. So looking at mine, how much of the patterned part do you want to cover the black essentially. Once you’ve measured, cut that portion of scrapbook paper out. (Remember you will need two of these the exact same size for each canvas)

STEP THREE

Cut out your quote from the printer paper to fit the scrapbook paper the way you would like. My quote was slightly smaller than the scrapbook paper in order to have the scrapbook paper serve as a border to the quote.

STEP FOUR

Paint the black paint onto the canvases covering them thoroughly and completely. Let dry then paint a coat of mod podge on top, I used glossy but you can use matte if you would prefer.

STEP FIVE

Mod Podge the quote onto the scrapbook paper. Make sure its nice and straight and centered! Then mod podge the scrapbook paper onto the canvases centered on each! For this part, I found that the scrapbook paper I used was a bit thick so it lifted at the edges. If this happens to you, you can do what I did and use a hot glue gun to glue the edges down.

Image

STEP SIX

Once all of this is mod podged down, use mod podge to go over all of them and create a nice finish to it all.

STEP SEVEN

Let it FULLY dry!!!! Then flip it over and lay out your ribbon leaving plenty of dangle room for it to hang! This is important, make sure it is 100% dry on the front, if not, it will stick to anything it touches and will probably ruin your work if it does.

STEP EIGHT

When you have your ribbon laid out perfectly, either hot glue or staple the ribbon into the wooden edges of the canvas. Don’t skimp on staples, if you do it will hang awkwardly, make sure you use lots to ensure its hanging straight and firm!! And you’re done!

DIY: Glow-In-The-Dark Canvas

Image

DIY: Glow-In-The-Dark Canvas

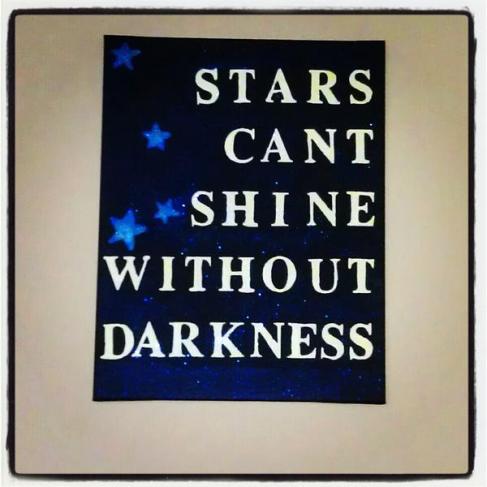
So let me start by saying that the picture for this one is a little off just because my Android isn’t exactly amazing at capturing the glow-in-the-dark effect in a dim lit room. BUT it really does look pretty cool. So anyway!

WHAT YOU WILL NEED:

  • Canvas, any size you want
  • Foam brushes
  • Glow-In-The-Dark Paint (I got mine at Hobby Lobby but I know Walmart sells some as well)(Yellow if you’re copying mine)
  • Glitter
  • Paint (Black and white if you’re copying mine)
  • A very fine tip paint brush
  • Peel and Stick letters (These I found hard to find the right kind, I ended up just getting some scrapbooking style letters that were the right size)
  • A quote!
  • Pencil

STEP ONE

Find a quote! I find Pinterest as always to be a great place for such things!

STEP TWO

Lay out your letters in the arrangement you want. Once you have them how you want, trace the outlines of the letters with the pencil.

STEP THREE

Now what you’ll want to do is paint the rest of the canvas the color you want, in my case black, using the foam brush. Go over the letters with the foam brush, but be gentle over the letters. If you use the kind I used they move if you paint too roughly with them. Use the fine brush around the edges of the letters if you need to. Paint as many coats as needed to get a full cover.

STEP THREE

Peel off the letters! Do this carefully and slowly! Make sure the paint is dry!

STEP FOUR

Using the fine tip brush, paint over the letters with white paint. This will just help clean up any smudges of the black. After, paint over the letters with the glow in the dark paint. This will take MULTIPLE coats. Glow in the dark paint is thin!!

STEP FIVE

If you’re copying mine, outline some stars in pencil then use thick layers of glow in the dark paint to outline them and fill them in.

STEP SIX

This is what was the hardest part. Here to get the glittery, galaxy effect you have to incorporate the glitter into the paint. So what I did was I mixed black paint, glow in the dark paint, and LOTS of glitter. I mean lots. If you don’t use enough, the black will overpower it. Mix the paint in equal parts, make sure the black color is dominant. Next use the foam brush to make a layer of the mixed paint and glitter over the already black surface. You don’t need to cover ever spot of the canvas with this, but you can. Let it dry, if you need to you can add more glitter. More glitter never hurts!!

STEP SEVEN

Let dry and admire your craftyness!!!!

DIY: Scrabble Name Board

Image

DIY: Scrabble Name Board

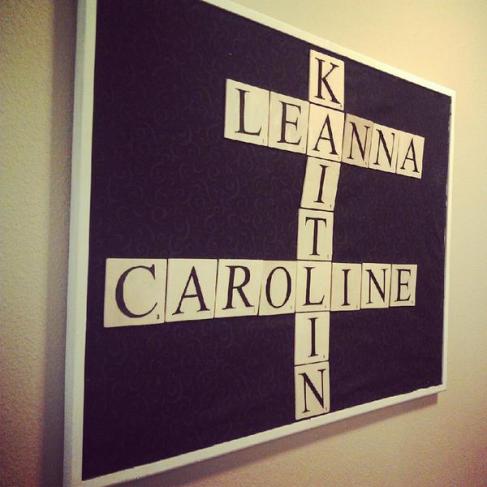
Well, I think its pretty darn cute. This past summer I was getting ready to move in with two of my friends and came across something similar on Pinterest. I didn’t want to attach wooden letters directly to the wall though, so I decided to make a little scrabble board on an old bulletin board we had just sitting out in our garage. Unfortunately, I didn’t take step by step photographs for this craft. But I still would love to share how I went about making it!

THINGS YOU WILL NEED:

  • Board of some kind (Foam board, bulletin board, wooden board, etc)
  • Mod Podge
  • Computer and printer
  • Sharpie
  • Wooden squares (I got mine at Joanne’s for about $0.20 a piece!)
  • Paint (If you would like)
  • Fabric
  • Hot Glue Gun

STEP ONE

First and foremost, find a board to put the letters on. The board you use will be a big determining factor in the size of the wood blocks you use for the letters.

STEP TWO

Once you have your board, go out and buy how ever many wooden squares you need in order to make the names of the people you would like to scrabble together! I recommend you measure out the board and then do some math to figure out what size squares you need.

STEP THREE

Using any old computer, pull up a word processor and type out the names of the people you will be printing. You can use any font you want, I used Times New Roman. Use a larger font. Again you will have to play around with the font size based on how large the squares you are using are. I printed a few letters out at a time and tried them out for size before printing them all out. Once you know what size font to use print out all of your letters!

STEP FOUR

And now here’s the pain in the butt part of it all. Which also, consequently, is the most time consuming part (in my experience). Now you will need to go and cut out each letter meticulously.

STEP FIVE

Now that you have all of the letters cut out, go ahead and mod podge each letter onto a wooden square. Do one coat of mod podge under the letters and one on top to make sure they really stick down to the wood.

STEP SIX

So while you’re waiting for your letters/squares to dry you can go ahead and do what I did and paint the edges of your board if you have one. I painted the edges of my bulletin board white just to make it look newer and neater. If you don’t want to do that you can move on to the fabric part of the craft.

STEP SEVEN

So depending on what kind of a board you have, or just personal preference, you may or may not want to cover your board with fabric. Since I had an old bulletin board that was pretty torn up and nasty, it was an easy choice to cover mine with fabric. I went out and got a little more than a yard of fabric (I was fine with having extra so I didn’t measure my board before hand). I then went ahead and laid the fabric of the board and put push pins into the edges to hold it in place. I then drew with a pencil around the edges of the parts I would be cutting off. After doing this I unpinned it and cut the excess fabric away.

STEP EIGHT

Next, lay your fabric down on the bulletin board with the push pins again just to make sure it all fits. If it fits pretty tightly, not to worry, the hot glue will hold it pretty securely. Now what you need to do is go around the edges of the board and hot glue the fabric onto the board taking out the push pins as you go.

STEP NINE

Now that you have the board complete, you’re ready to touch up your letters. As your probably now noticing, printer ink and mod podge don’t mix. At all. In fact, when you mod podge the letters on to the wooden squares, the ink will fade significantly. However, that my friends is what we’re about to fix with this step! This is where the sharpie comes in, as you may guess. Now just outline all of the letters in sharpie. This actually ends up looking nice and glossy and gives it a great finish!

STEP TEN

AND LAST BUT NOT LEAST!! Finally lay out all of the wooden squares/letters on to the board in the arrangement you desire. When you have chosen an arrangement go ahead and hot glue each wooden square onto the board, make sure you leave the rest of the wooden squares/letters on the board to ensure proper spacing and arrangements.

STEP ELEVEN

Marvel at your crafty abilities and enjoy!!

DIY: Mod Podge Frame

DIY: Mod Podge Frame

December 16, 2012

Image

DIY: MOD PODGE PICTURE FRAME

A few months back I decided I really wanted a zebra print frame (kind of zebra print obsession), but couldn’t find a reasonably priced one. So, I decided to make my own!

What you will need:

  • Cheap, wooden frame (I got mine from Michael’s for a few dollars)
  • Mod Podge (Before buying it, look into making your own. There’s great DIYs on Pinterest. Much cheaper than buying it)
  • Foam Brushes
  • Scissors (I used a straight edged paper cutter, which I highly recommend-super useful)
  • Ruler
  • Selected scrapbook paper or tissue paper
  • Wooden letters or words (If you would like, I chose to but obviously its up to you)
  • Glue gun (If you would like to use the letters/words)
  • Your choice of paint color

Image

STEP ONE

So whenever you’re ready to start, your first step will be to measure the edges of your frame both in length and width (The edges where you want the paper). Once you have measured the edges, you can then cut the paper to the corresponding size. I then laid my pieces of paper out on the frame to make sure they were all the right size.

Image

STEP TWO

When you have all of your pieces measured and cut out, then you’re ready to mod podge them on to the frame. I used one coat under the strips of paper and then laid another coat of mod podge of top to give it a finish and secure it. Smooth out any bubbles as best as you can while you go along. There will most likely still be some bubbles when you’re done mod podging though. Don’t worry, most if not all of them will go away when it dries.

Image

Image

STEP THREE

The next step after you have your pieces mod podged onto the frame is to paint the sides of the frame or, in other words, the pieces where you still see wood. I used black paint to go along with the zebra theme, but again its up to you and your theme. This step is a little controversial for me almost. While I was doing it, I kind of wondered if it would have been easier to paint before I mod podged, but again thats up to your discretion. Just be careful not to paint your pieces if you do this step after mod podging.

Image

STEP FOUR

Well, really you could probably combine this step with Step Three. BUT ANYWHO! So for this step I set aside my frame and started painting my words. Pretty straight forward, just painted a few coats of black onto the words and made sure to get into all the nooks and crannies! So let that dry, then once its dry I recommend going over the painted words/letters with a thin layer of mod podge to give it a finished look!

Image

STEP FIVE (optional)

ALMOST THERE! So by this point I had everything painted and mod podged. Finally, I went ahead and arranged my words onto the frame where I wanted them. Then completed the final step in hot gluing them onto the frame! Warning: Make sure to use PLENTY of hot glue if you’re doing this step, or they won’t stay on.

Image

Finish it off by putting some pictchas in there and you have yourself a cute DIY frame that costs FAR less than buying a similar frame!!